

Using a ring stretcher doesn’t have to be complicated—when you understand the right technique, a pressure-style ring stretcher lets you size a ring quickly, safely, and with professional accuracy. This guide shows you exactly how to do it.
Step One: Measurement, Target, and Safety Check
Before you engage the jewelry stretcher, preparation is key. This initial step determines if your ring is a good candidate for stretching and what your exact goal is.

1. Determine the Target Size
- Accurate Sizing: Start by using a standard ring measuring stick (also known as a ring mandrel or sizing stick) to determine the ring’s current size, Scurrent.
- Set Your Goal: Clearly identify the desired target size, Starget.
- Stretching Principle: To prevent stressing the metal and to maintain the ring’s integrity, we strongly recommend stretching no more than 1/2 of a US size at a time. If you need to increase the size by more than one full size, consult a professional jeweler, as excessive stretching can thin the band.
2. Ring Compatibility Check
Not all rings are meant to be stretched. This safety check is non-negotiable to protect your precious pieces.
- Material Restrictions: A ring stretcher tool works by gently displacing the metal. This requires a malleable metal like fine gold, sterling silver, or high-karat gold alloys. Clearly exclude hard metals such as titanium, tungsten, and stainless steel—these metals are too brittle or hard and will not stretch; attempting to do so will only damage your equipment and the ring.
- Gemstone Inspection: Carefully inspect all gemstone settings for security. Stretching puts outward pressure on the band, which can loosen delicate settings. Do not attempt to install if the ring has complex pave (cluster) or tension settings. Simple bezel or sturdy prong settings are generally safer candidates.
3. Equipment Preparation
Ensure your pressure stretcher’s mandrel and base are clean, smooth, and free of metal filings or wear that could scratch the ring’s surface. A clean tool is a safe tool.
Step Two: Positioning & Pressing
With the safety checks complete, it’s time to use the ring enlarging tool. The goal here is uniformity.
1. Ring Positioning
The way you place the ring dictates the quality of the stretch.
- Mounting: Smoothly place the ring onto the mandrel of the pressure stretcher. Crucially, ensure the bottom edge of the ring contacts the stretching base evenly.
- Key Tip (Achieving Evenness): Use a marker to place a tiny, unobtrusive mark on the inside of the ring. This allows you to track and observe the precise rotation angle during the cycle.
2. Applying Even Pressure
The pressure-style stretcher is superior to hammer-style stretchers because it delivers controlled force.
- Slow Operation: Slowly and smoothly rotate or press down the mechanical handle. This action causes the mandrel to evenly expand, applying gentle pressure to the inside of the ring.
- Micro-Stretch Principle: Adopt a “less is more” mindset. Apply only a very small amount of pressure each time. Stop immediately when you feel a slight, palpable change in the ring’s size or resistance.
3. Release & Rotate (Achieving “Evenness”)
This is the most critical step for avoiding an egg-shaped or oval ring.
- Release Pressure: Gently lift the mechanical arm to fully release the stretching force before moving the ring.
- Rotate: Rotate the ring 90 or 180 degrees on the mandrel. The mark you made in Step 2 helps guide this.
- Repeat: Repeat the “pressure-release-rotate” cycle. This method of multiple small stretches is significantly safer and produces far more even results than attempting a single, deep stretch.
Step 3: Verification & Finish (Refine to Perfection)
Once the ring appears to have reached your target, it’s time to measure and finalize the result.
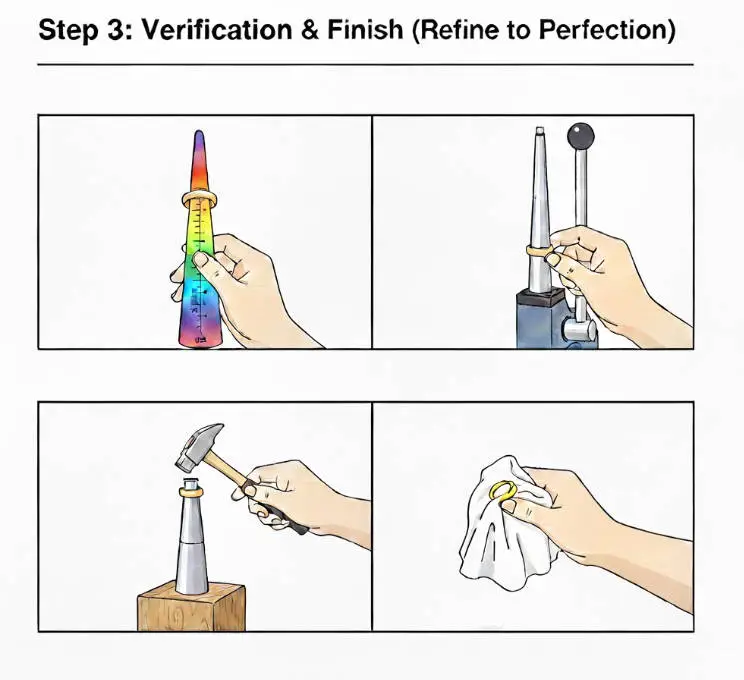
1. Mid-process Verification
- Checking the Size: When the size feels close to Starget, remove the ring entirely from the jewelry enlarging tool.
- Remount and Measure: Measure the size, Scurrent‘, again using your standard ring measuring stick. Always measure off the machine.
2. Refine to Perfection
- Final Cycles: If the size is still insufficient, put it back in the stretcher and repeat the small stretch cycle, paying close attention to the rotation.
- Shape Correction: If the size is correct but the ring is slightly off (e.g., slightly oval), you can gently correct the shape using a nylon hammer and a smooth steel mandrel.
- Finishing and Cleaning: Confirm that the final size, Sfinal, accurately reaches Starget. Clean the ring surface with a soft cloth to remove any marker residue or debris to complete the process.
Conclusion
Mastering the use of a professional ring stretcher allows you to provide perfect sizing for your clients or your personal collection with confidence and precision. By adhering to the principles of slow, controlled pressure, and critical rotation, you can safely adjust the size of most malleable metal rings without compromising their structure or gemstone security.
Ready to achieve perfect sizing in your own workshop? We offer a full range of high-precision jewelry sizing tools, from robust pressure-style ring stretchers to calibrated measuring sticks and shaping mandrels. Visit the JYBS website today to explore our selection and upgrade your toolkit—your next perfectly sized ring is just a tool away!